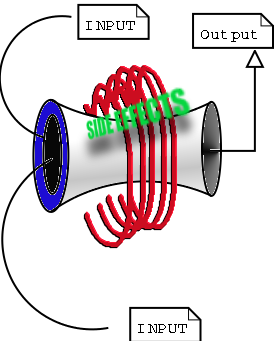
Illustration 1. The Universal Process
NY
LXS
GNU/Linux 1
An Introduction to
Computer Usage and Design for the Beginner
By Ruben Safir , Paul Robert Marino and Charles Nardino
©2003 by NYLXS, Inc
Table of Contents
Chapter
1
Everything Is a Process 3
Understanding Your Computer as a Machine and Overcoming Fear 3
Processes
and Information
Everything Begins with the User 3
Chapter
2
Preparation for Installation 7
Owning Your Box 7
Hard Drives 8
IDE and SCSI interfaces 8
Partitions 8
File Systems 9
Directories 10
Chapter
3
Installation Theory and Practice 11
How to create something from nothing 11
Partitioning a Hard Drive 12
Planning your system 12
Partition Schemes 15
Chapter
4
Laying down a File system: 17
Creating Swap partitions 17
Laying down your file systems 17
File System Layout 18
Chapter
5
Kernel Essentials For The Uninitiated 20
Understanding What Makes Your Computer Tick 20
What is a kernel and which Kernels to use? 21
Chapter
6
Software Packages and System Upgrades 23
Adding Functionality to Your System 23
Package Management 25
Fundamental Networking 26
Fundamental User administration 29
File permissions 29
Adding A User 31
root user 32
Basic Mail 32
Use of X: 35
Chapter 1
Everything
Is a Process
Understanding Your Computer as a Machine and Overcoming Fear
GNU/Linux 1 is a course designed for students who have been born into the computer era, and didn't have the benefit of watching the slow development of computer systems during their lifetime. Because modern microcomputers, the PC that most people are familiar with, are so complicated in their software design, the user today is separated by several layers from the actually operation. The public has been sold on the idea that these levels are beneficial to the common user, however in truth, this idea was not conceived for their benefit. It was and still is part of an overall marketing strategy by commercial vendors of computer hardware and software. The common myth is that computers are complicated beyond ones ability to understand them without years of specialized study. But this is hardly true.
The purpose of this class is to show you how your computer works and to end this myth about its complexity. This is not to say that there are not aspects of your computer which are complex, because that would be untrue, as it would also be untrue about the design of trees, flowers, and your refrigerator. But at a fundamental usage level, computers are not at all complicated. All computers share several fundamental characteristics which an average person can learn in a few minutes.
Computers exist in the real universe, and as such, they do real work just like any other machine. In this regard, they share with all other machines the characteristics of a process. All computers perform processes, and all processes share simple rules that you already understand, but might not have thought about. In most cases, computers are designed by human beings to be used by other human beings. In this regard, they are designed( some better than others) for your enjoyment, and use as a tool. In the 50 years of computer development a lot of thought has been given to the human/digital device interface. These systems are designed in the hope that you will be able to use them. Once you become familiar with the basics of computers you should be able to adapt to a broad range of general purpose systems, even systems that may roll off the assembly lines in the future.
Processes
and Information
Everything Begins with the User
Illustration 1. The Universal Process
All activities in the universe involve processes. This is a fundamental truth of nature enshrined in the three laws of entropy. Everything in the universe, from the creation of stars and galaxies to the baking of a cake, involves processes, and the end result is an increase in heat. Any thing that exists in the universe, and dose work, must adhere to these laws. Since computers exist in the universe, and do work, they use processes in order to get their work done.
All processes have three components: Input, Output, Side Effect. A car engine takes in gasoline as an input, exhaust and heat as an output, and produces motion as a side effect. In most complex processes, the “side effect” is the desired effect that you want. Your computer has input devices, and output devices, and produces side effects. In fact, what you would customarily call a keyboard is actually called( in computer lingo) a standard input device. Your computer monitor is the standard output device. In the simplest construction, every computer runs a process which takes standard input, returns standard output, and then produces a side effect.
In fact, your computer is capable of doing what is known as multitasking. This simply means that your computer is capable of running multiple processes simultaneously, keeping each of their inputs, outputs, and side effects separated. Understanding that your computer is a process generator is fundamental to all problem solving, and debugging with computers. When problems happen, solving them intelligently depends on your ability to understand the process your computer is being called on to solve, and analyzing the inputs, the outputs, and the side effects.
What you would normally think of as a single computer, your PC system, is in reality composed of multiple computers. Your hard drive is a separate computer with memory and chips, your monitor is a computer, and your printer is yet another computer. In the case of your printer, the standard input is an encoded signal which is received from a parallel or USB cable interface, and it's output is print on paper. Your hard drive, the device which stores information permanently. It gets information from an IDE ribbon, or a SCSI ribbon, and it's output is the signal that information was correctly recorded or transmitted. The side effect is the physical etching of information onto disks.
In order for a computer to be useful, it must interface with the real world. All computers interface with the world through hardware that is designed to do something. That something is usually a highly flexible function, and is highly responsive to complex and changing inputs. But in the wonder of the complexity of computer capabilities, we often fall into the trap of forgetting that computers have an absolute limit to their capabilities. Program all you want, all day, and all night, but there is no possible way to get your computer to get up off the table every day at 6 AM and walk your dog for you. Only if you develop the hardware necessary to accomplish that task, can you program your computer to walk your dog.
In the old days, when you brought a computer, it came with a map of all the places in the memory that were capable of doing something in the real world. A specific memory location, for example, would turn your screen green, and another location in memory would control a specific dot on the screen. Turning your entire screen green, with a red dot in the middle of the screen was a two line program, if you directly accessed the memory locations that controlled the hardware outputs of those functions.
Beginning with the IBM PC, this level of specific information about the design was no longer shipped with the computer. The result of that was that home users were put at a considerable disadvantage in their ability to write many types of programs. On the other hand, much of the IBM PC was standardized over the industry. The standardization on motherboard design and CPU construction allowed for broad access to those who were able to obtain this information.
The GNU/Linux One program will teach you much about the basics of your computer using Free Software. Free Software is software that is written using collaboration between individual programmers, who offer their work to others, with licensing which assures permanent public access to the program code and function. This style of program design assures that people who use Free Software can never be alienated from their programs, nor can their digital systems ever be used to suppress their participation in the larger society, in which they live. As a result, Free Software is ideal for learning about general computing.
The purpose of this program is to teach you all the basics of computer design as it affects you in your day to day use. You will learn how to:
Install a Free Operating system on a blank computer
how to set up users.
handle your network setting and services.
how to configure a graphic user interface.
how to maintain your system and update your computer from publicly available sources.
how to compile a program, and how to compile an operating system kernel.
At the end of this class, your task is to join with your classmates and to run your own installfest. An installfest is a traditional Free Software event where members of the community help newcomers with the installation and configuration of Free Software on their computers. In a word, this classes is designed to transform you from student to mentor, and to help you to become part of the chain of enlightened citizens in a Free Society.
Chapter 2
Preparation
for Installation
Owning Your Box
The first step in understanding computers is to take ownership of your hardware and software. As the owner of a computer, you should first understand the relationship between your equipment and the software that runs on it. While it is more convenient to buy a system with a preinstalled operating system, eventually, because of upgrades, hardware changes, or problems, you're going to need to alter the configuration of your system. Starting with a blank computer presents you with a fresh sheet of paper to work on, and allows you to learn about all the primary parts of your system. For this reason, learning to install an operating system on your computer, particularly a Free Software Operating System, is a critical step in learning about computers. And the first step in learning about digital systems is to explore the properties of the critical hardware on your PC.
An operating system (OS for short) is the core software component that knows how to talk to all the hardware. It gives other programs access to hardware. GNU/Linux is the OS that we will be learning to install and use. As a Free Software OS, anyone can download it and install it, and GNU/Linux comes in different flavors. Flavors is a term used in the computer industry to describe more than one OS that share a common core, which have different features, and utilities. Another word for flavors used among GNU/Linux users is distribution.
In this class you will install it twice: Once using the Slackware distribution of GNU/Linux, and the second time with the SuSE distribution of GNU/Linux. The two distribution are very different. The Slackware distribution of the OS is simpler than SuSE and allows students to learn about the computer systems through a largely hand crafted method of installing. The SuSE distribution of GNU/Linux is more complex and has a more graphic installation program, that can bypass many of the decision making processes that you might otherwise want to control.
Both versions of GNU/Linux are easy to install and make robust desktop and server computers. Still there are many differences, and by doing both installations, you will learn how the automated systems in a distribution like SuSE works, preparing for that inevitable day when the Graphic User Interface (GUI) tools failed to do something as you expected.
Hard Drives
Hard Drives are physical devices that are designed to store data. Data is stored on a set of spinning electromagnetic platters (disks), accessed through a small built in computer on the hard drive. Each drive contains within it a series of these electromagnetic platters. And each disk is divided into a addressing system called the low level format, which assigns addresses to physical locations on the platters. This low level format is different for each hard drive model and is only understodd by the drive.
The low level format, and the drives firmware (a type of software that has been etched into the hardware) that run the disk present an imaginary but universally known standardized interface to an OS. Operating Systems understand this higher level, standardized interface and can then use this standard to read and write to the real hard drive since the computer on the hard drive and your computer both understand this imaginary standard.
This system allows manufactors of hard drives to innovate and change things internally while still presenting a standardized means of access to all computers which speak the standardized interface which the hard drive is designed to attach to.
IDE and SCSI interfaces
There are two common types of standardized interfaces used for disk drives. The most common interface on the PC platform is IDE. The second most common interface is SCSI.
Most PCs have two IDE controllers, each one is can have two drives connected to it. The first drive on a controller is called the master or primary drive. The second drive on the controller is called the slave or secondary drive. Under GNU/Linux each drive is assigned a letter based on which controller it's on and whether it is the primary or secondary drive on the controller. On the first controller the primary drive is assigned /dev/hda and the secondary is /dev/hdb. On the second controller the primary drive is assigned /dev/hdc and the secondary is /dev/hdd.
SCSI controllers can usually be found on higher end computers, network servers, or top of the line PC workstations. SCSI controllers can have many devices connected to them. Every SCSI device is assigned a number that is used by the controller to keep track of each device. The interface on a SCSI controller is called the SCSI bus. If the SCSI controller supports at least 7 devices. The SCSI bus presents to the computer a range of devices from 0 to 7. One number on the bus is always reserved for the controller itself. One of the things that makes SCSI more complicated than IDE is the fact that is can support many different types of devices. A typical SCSI bus might have a couple of hard drives, a CD ROM drive, a scanner, and maybe even a printer. Say you have three hard drives on a SCSI bus GNU/Linux would call the one with the lowest number on the bus sda and the one with highest number on the bus /dev/sdc. If the SCSI bus has two CD ROM drives GNU/Linux would call the one with the lowest number on the bus /dev/scd and the one with the highest number /dev/sde. SCSI devices can have other designations as well. They are often called /dev/sga through /dev/sgg. A SCSI IOMEGA zip drive, and many tape backup systems will often present itself as an /dev/sg device.
As you can see, SCSI devices are more complicated and we will mostly work in this course with IDE interfaces. But you should be aware that SCSI devices exist and that they can be called /dev/sd or /dev/sg interfaces. Also be aware that all SCSI cards (the part of the computer which allows for SCSI interfaces) and different and need seperate computer code to help the computer to talk correctly to the card. Don't worry, this code is not created by you (unless you want to write it yourself). But you might need to know how to tell your computer which SCSI card you have and 'load' the interface into memory.
Partitions
Part of the interface between the hard drive, and OS includes the means to divide up the drives into memory independent sections. All file reading and writing takes place within these independent sections of the drive called partitions. A hard drive must have at least one partition. Activities in one partition of the disk are generally independent of activities in other partitions on the disk. Normally it is not possible to write a file that spans over two partitions.
Each partition essentially acts as a separate disk. Each physical disk can have four partitions. If more than four partitions are needed an extended partition can be created that can contain virtual partitions which will be discussed in the next chapter. If /dev/hda has four partitions GNU/Linux will call the first partition /dev/hda1 and the fourth /dev/hda4. If the /dev/sda has four partitions GNU/Linux will call the second partition /dev/sda2 and the third /dev/sda3. If you don't know what /dev/hda or /dev/sda are please reread the previous section “IDE and SCSI interfaces”. Within each partition we can lay out a file system.
File Systems
A file system is a database that sits in a partition, and organizes the placement and access of files. All operating systems need to be able to read a file system in order to store, and read files on hard drives and other media. Floppy disks, CD Roms, Zip Disks, Jazz Disks, and other storage media all have file systems. Different operating systems use different preferred files systems. However, the file system in use on a disk is not specific to an operating system. Linux can layout many different kinds of file systems into a partition, including the old standard ext2 file system, dos, vfat, which is the old Windows 95 style file system. There is also the new ext3 file system, Reiser, many others, depending on your distribution.
Currently, the most common native Linux file system is ext2, although we are seeing an increasing number of systems with the more advanced Reiser, and ext3. All 3 of these file systems are native Unix type systems, and work through an inode table to find files. Many operating systems do not have inode tables and use other means to store and retrieve files from their hard drive databases. However, an inode based system has many advantages and is commonly adopted in more advanced systems. An inode is an entry in your file system which stores the location of a file. The inode also stores the names (a file can have more than one name) the file is associated with and the ownership and permissions for the file. Inodes also store the files, last accessed time, and its last modified time. Partitions have a limited number of inodes which they can use. It is possible for a partition to run out of inodes before it runs out of physical space on the hard drive. On a properly configured computer this should never happen.
Inodes are not in a human readable format. We need yet another method to find our files on our computer, one that is more people friendly. Taken together, the inodes create an understandable Hierarchical file system, formed from the file names in the inodes within partitions (Remember that each partition has a different set of inodes). Together they form a system which looks like an upside down tree. The tree starts with an inode that name a root file called '/'. Root is a directory and has other files “underneath it.” These files can be additional directories or actual files. Everything in Unix can be accessed through a file. Starting with the root directory, directories and files are described in the inodes is such a way as to describe their relationships. Directories are attached to other directories above and below it in the file system. All the directories in the file system together produce what looks like an upside down tree. Each file, then, has at least one absolute filename. My mailbox, for example, might be called /var/spool/mail/teacher. This would mean that the files base name is teacher is under the mail directory, under the spool directory, under the var directory, under the root directory. Remember, however, that the OS itself doesn't care about this convention. It cares only that there is a partition on the system with inodes. The partitions themselves are assigned names. In this case, I might have a partition called '/var/spool' and represent /dev/hda3 (the 3rd patition of the first hard drive on the IDE bus). Under this partition, the operating system finds a file called '/mail/teacher'. It then finds the sector and blocks where the file is stored on the hard drive. It then asks the hardware to go to the sector and block on the partition where the inode says. And it then gives you access to the file.
As was said, since the names are meaningful to only the human beings interacting with the computer, the inode can create more than one name for the file. The file can have many names, as along as all the names relate to the current partition. So a file in our example can be called '/var/spool/mail/teach' can also be called '/var/spool/mail/joe' or even '/var/spool/teachersmail' . But it can not be called '/usr/mail/joe' because the '/usr' subdirectory, in our example, defines another partition, and another database of inodes. When a file has 2 names in its inode, this is called a hard link. Until all the links to the file are removed, the file remains in the inode database. After the last link is removed, the file is marked for removal and the inode becomes available for another file in the inode database.
Directories
Directories are files which mark a location in the file system Directory entries can also describe the root of other partitions. In the Microsoft Windows Operating System each partition is represented by drive letters, C,D,E. In GNU/Linux and Unix all the partitions and even other hard drives which are attached to the system is seamlessly integrated into the file system to appear as local directories whether or not the partitions which are mounted to the file system on the same hard drive, on another drive, or a networked hard drive miles away.
Partitions on hard drives are 'mounted' onto the hierarchical file system through directory entries. The drives can also be unmounted from the file system. When they are unmounted, they disappear from the file system and you loose access to the information on the partition. If your computer is on a network, you might be sharing with others access to a partition on a hard drive in a computer expressly designed to share partitions and files over a network. You would 'mount' the networked partition on your file system as well, and work with those files exactly as if it was attached locally on your own computer.
Chapter
3
Installation Theory and Practice
How to Create Something from Nothing
Installation Process
It might seem impossible to install the operating system onto the computer, when working with a clean hard drive, and only a CD ROM with your operating system on it. After all, if you turn on a computer without an operating system, then it just sits there and it does nothing. This is not exactly the case. As was mentioned previously, your computer is limited by the inherent ability of its hardware. And we said that, for example, your hardware could not be programmed to rise from the table and walk the dog. However, your computer is designed with the mechanical means to search for a small binary program that will allow it to read raw information from one of it's devices in order to load an operating system. This process is called bootstrapping. The programs which bootstraps your computer are small binaries written for the Central Processor Unit( the main 'brain' of the computer), and enables it to fetch the remainder of the OS from a segment of a device.
Most modern computers have hardware and firmware, to boot from a device, such as the floppy drive, the CD ROM, from a local hard drive, or directly from a network location. Once the hardware finds a boot loader in one of these locations, the computer can then load a small but core operating system directly from these medium. The operating system then comes alive and interfaces with the formal file systems, network devices, and other hardware, awakening one step at a time.
On a new machine you have no OS files on the local hard drives, or a boot manager program. Instead, you can boot your computer off of a CD, and read an operating system from the CD. Once an OS is running in your computer memory (and this operating system can be of a different kind than the one you eventually expect to install on your hard drive )you can use that temporary operating system to access your hard drive to copy necessary files to your permanent hard drive.
So, in order to do an installation on a fresh new computer, no matter what operating system you wish to install, the following steps must be taken.
Boot a temporary OS from a bootable device.
The temporary operating system must access the local hard drives.
The hard drives must be partitioned.
File systems must be installed onto the new partitions
An order of mounting must be determined for the partitions
The permanent OS files must be installed on the newly made file system.
The permanent Boot Loader program is installed onto the Master Boot Record of the system.
The installation disk is removed and the computer is rebooted.
Partitioning a Hard Drive
Planning Your System
The first step in installing any OS is to boot the computer and to place an OS into memory that will let you manipulate the hardware to lay down the permanent OS. The first segment of the hard drive contains the master boot record. The last step in installing your new system involves creating a proper record in the MBR (Master Boot Record )so that the system can boot on startup. In between you must execute a plan to build your computer. You must choose how to partition your available hard drives, what kinds of file systems to lay in your partition, and which OS packages you want to install. The hardest part of this process is partitioning your new drive, and laying down file systems. With a little bit of work, you can learn to do this with minimal effort. It's all very simple once you understand the basics.
When partitioning your hard drive you need to become familiar with the fdisk program. fdisk is a tool that will create your partitions on your hard drive and record them in the MBR in what is known as the partition table. This table is another non-operating specific part of the disk that the hardware can read and understand inherently.
Regardless of the Graphic User Interface (GUI) which might come with your distribution your installation software must create a table describing the location of file systems, and how they are connected in your file system.
Commonly, these interfaces call fdisk to create your partition table. Most Oss have some form of fdisk to define the partitions and mark them for specific filesystem types.
When installing your computer, you put your Installation CD ROM the tray and restart your computer. When using a Slackware disk, you discover that your computer loads a small version of the Linux Kernel from the CD ROM. If your computer doesn't recognize your Slackware boot disk right away, don't panic. This simply means that your BIOS in the firmware of your computer is not set to boot from the CD first. If this is the case, restart your computer again, and watch carefully as the machine starts. Most computers give you a message that says, “To Enter Setup Press Escape.” Keep in mind this exact instruction is only on some specific machines. Others might ask you to press F1 or some other key. But all PC's have a means to enter the firmware BIOS. A Bios is just a small program built directly into your computer to help setup hardware. When you enter your Setup program, (which is the Bios), look for something called boot management, or device boot order. Don't be afraid of breaking your computer by making a mistake in the Bios. It is nearly impossible to do real damage to your computer by changing any of the options. When you find the boot order, change it so that booting from the CDROM. is the computers first choice. Then save and exit the bios program and the computer will now restart, and search for your CDROM. When it finds your Slackware disk, it will find the Boot Loader on the disk and begin to load a scaled down version of the Linux Kernel.
Next, Slackware will ask you a few questions which you can effectually ignore. One such question is if you want to add extra parameters to the boot loading instruction or if you want to mount a pre-existing hard drive partition instead of the CD ROM. Just press enter or answer no (which ever is appropriate). And the disk will now load the Linux Kernel. Then it does a little piece of computer magic.
Your computer contains a component called Random Access Memory (RAM). In the old days, computers didn't have hard drives, and only had RAM to store memory in. It is the main memory that your CPU interacts with to store data. Data could be records, programs or instructions. Your computer has the ability to emulate a small disk in the RAM of your computer, and mount it to your file system for access. This is called a RAM Disk. Many installation programs do this for various reasons that we will cover later. But one of the benefits of this technique is that it allows you to manipulate things in RAM as if they were files on a disk.
The Slackware installation disk will create one of these RAM disks, or mount the CDROM. directly depending on the circumstances or the version of Slackware your using. But either way, the temporary version operating system, when done booting, makes several important programs and files available to you which are needed to complete the installation process. One of these programs is fdisk.
When the temporary version is done booting, the system gives you a login prompt on the command line. One thing that distinguishes GNU/Linux from the traditional Microcomputer Operating Systems is that GNU/Linux is a multiuser system in its basic design. This means that whenever you want to interact with the system, you must first identify yourself by logging in. In this case, follow the instructions that Slackware prints on your standard output device, and login as root. Press enter at the password prompt. You are now at a command prompt with the full power of root. A few short years ago computer programmers across the globe would shake in jealousy at the power in your grasp. You are root on a Unix clone server.
On the command line we can call fdisk by specifying the device name as follows: fdisk /dev/hda If your machine is SCSI you would need to call it by its SCSI device name: fdisk /dev/sda. If you have multiple IDE hard drives in your computer, you will find the drives called /dev/hda, /dev/hdb, /dev/hdc, or /dev/hdd. Keep in mind that one of those IDE drives represent your Installation CD ROM.
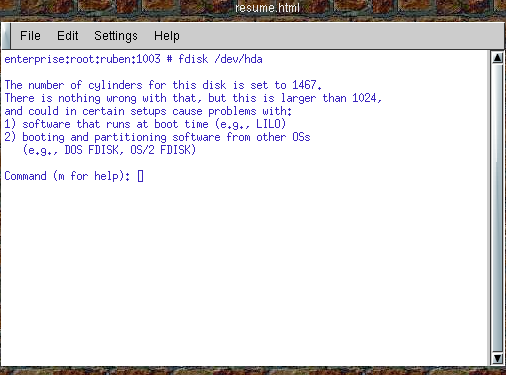 Illustration
2 Starting fdisk from the command line
Illustration
2 Starting fdisk from the command line
Once you fire up
fdisk, it takes over your console and you can interact with it. Enter
'p' to print out your current partitioning scheme.
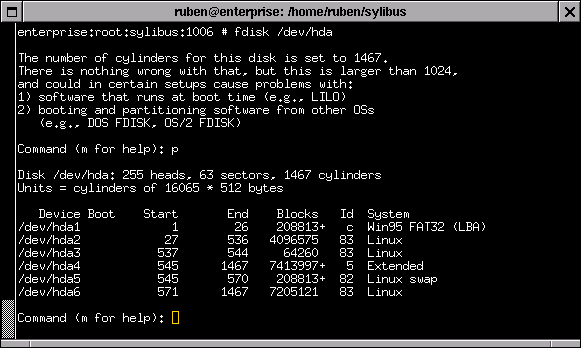 Illustration
3.Showing Partitions with fdisk
Illustration
3.Showing Partitions with fdisk
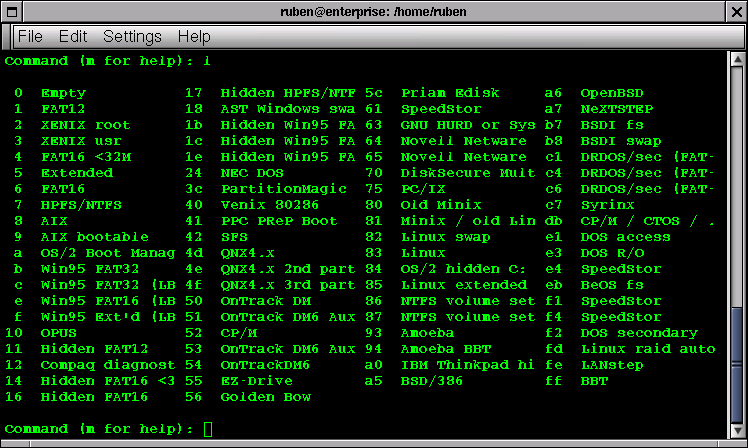
The most
important thing fdisk does is to create a new partitions. Press 'm'
for the menu options
Some of the interesting choices include 'i', which lists the kinds of file systems that can be laid out in your partition. Of special imports are ext2, swap, reiser, and ext3. All of these systems can be used in Linux.
 Illustration
4.fdisk menu
Illustration
4.fdisk menu
Lastly, you
should know that Linux supports an extended partitioning
scheme. PC hardware can only carve 4 true
partitions out of a single hard drive. One is used for swap,
leaving you with only three partitions to work with.
 Illustration
5.File System Options for Partitions in fdisk
Illustration
5.File System Options for Partitions in fdisk
We can create and destroy partitions, and mark them by type using fdisk. The 'n' command will add a new partition, and the 't' command will allow you define the type of partition. Partition types are defined by number. 82 is Linux swap space, and a small amount of swap, say about 130M, should be created in the 1st partition. Type 83 a Linux ext2 partition, which is the most common currently seen in Linux, although this is changing. In order to create more than 3 working partitions, Linux supports what is known as extended partitions within a primary partition. This allows us to create ten or more partitions on the drive as needed. After creating the partitions, extended partitions behave exactly like primary partitions
Partition Schemes
Often on mailing lists, a religious war breaks out over the correct method of partitioning a hard drive. I'm personally bias to a broad number of separate partitions and find it speeds up my file access. The down side to creating a number of small partitions is that you can run out of room on one in the partitions in your installation process, or later while using your computer.
Never the less, as a broad outline, I try to make separate partitions for / /boot /home /usr /opt and /var. If the drive has enough room, putting 3 gigs of space in /usr, 2.5 gigs in /var, and 3 gigs in /opt is good. I tend to put my Apache web server into /usr/local/apache, and can break that off as it's own partition on larger drives. If you run a database, it's a good idea to place that in it's own partition. The NYLXS, Inc. web server has a partitioning scheme which looks like this:
ruben@www2:~ > df -h
File system Size Used Avail Use% Mounted on
/dev/hda3 486M 339M 122M 74% /
/dev/hda6 2.8G 1.9G 885M 68% /var
/dev/hda9 3.8G 3.5G 122M 97% /opt
/dev/hda7 3.8G 3.4G 209M 95% /usr
/dev/hda5 2.8G 1.2G 1.5G 44% /home
/dev/hda1 95M 9.5M 80M 11% /boot
/dev/hda10 972M 829M 93M 90% /usr/src
/dev/hda8 972M 482M 440M 53% /usr/local
/dev/hda12 570M 96M 445M 18% /usr/local/var
/dev/hda11 1.9G 1.8G 10M 100% /usr/local/apache
/dev/hdb2 137M 80M 50M 62% /export
/dev/hdb3 972M 774M 147M 84% /export/usr
/dev/hdb5 1.4G 1.1G 336M 76% /export/home
/dev/hdb6 972M 744M 178M 81% /export/var
/dev/hdb7 1.0G 398M 586M 41% /export/usr/X11R6
shmfs 125M 0 124M 0% /dev/shm
df is a command which shows the structure of your file system. In this case you can see this computer has 2 hard drives, hda and hdb. hda has 12 total partitions, and hdb has 7. What is not seen here are the two swap partitions, /dev/hda2, and /dev/hdb1. I tend to like to put swap partitions in low number sections, closer to the center of the drive.
After making the partitions with fdisk using the n command, you need to write the partition table using the w choice on the menu. Make sure to mark swap partitions with the corect filesystem marker by using the 'T' command and setting the type to number 82. I usually create 135M swap partitions, which a few years ago was the maximum of a single swap partition. If you make it larger than this, in my experience, it will cause the system to slow down.
Command (m for help): p
Disk /dev/hda: 255 heads, 63 sectors, 2482 cylinders
Units = cylinders of 16065 * 512 bytes
Device Boot Start End Blocks Id System
/dev/hda1 * 1 13 104391 83 Linux
/dev/hda2 14 46 265072+ 82 Linux swap
/dev/hda3 47 110 514080 83 Linux
/dev/hda4 111 2482 19053090 5 Extended
/dev/hda5 111 493 3076416 83 Linux
/dev/hda6 494 876 3076416 83 Linux
/dev/hda7 877 1386 4096543+ 83 Linux
/dev/hda8 1387 1514 1028128+ 83 Linux
/dev/hda9 1515 2024 4096543+ 83 Linux
/dev/hda10 2025 2152 1028128+ 83 Linux
/dev/hda11 2153 2407 2048256 83 Linux
/dev/hda12 2408 2482 602406 83 Linux
Command (m for help):
When creating your file system by hand like this, it's a good idea to have a piece of paper and a pencil around to remember which partitions you intended to use for which section of the hierarchtical file system. In the old days, you had to calculate how many blocks you wanted and the block numbers to create each section. Today, you can tell fdisk that you want to start from the current location and add +3G of memory to the partition, until you run out of space on the drive. This would assign 3 gigabytes of space to the current partition. The extended partition, partition 4 normally, should take up the rest of your resulting drive. The extended partition will contain the remaining partitions.
Chapter 4
Laying
down a File system:
Creating Swap partitions
If we look under the /sbin directory on a normal distribution, you will see a number of programs beginning with mk.
root@www2:/home/ruben > ls -al /sbin/mk*
-rwxr-xr-x 1 root root 9307 Jan 13 2001 /sbin/mk_initrd
-rwxr-xr-x 1 root root 23188 Jan 19 2001 /sbin/mkdosfs
-rwxr-xr-x 2 root root 20376 Jan 19 2001 /sbin/mke2fs
-rwxr-xr-x 1 root root 5212 Jan 25 2001 /sbin/mkfs
-rwxr-xr-x 1 root root 7832 Jan 25 2001 /sbin/mkfs.bfs
-rwxr-xr-x 2 root root 20376 Jan 19 2001 /sbin/mkfs.ext2
-rwxr-xr-x 1 root root 13368 Jan 25 2001 /sbin/mkfs.minix
lrwxrwxrwx 1 root root 7 Nov 20 2000 /sbin/mkfs.msdos -> mkdosfs
-rwxr-xr-x 1 root root 29384 Jan 19 2001 /sbin/mkpv
-rwxr-xr-x 1 root root 31240 Jan 19 2001 /sbin/mkraid
-rwxr-xr-x 1 root root 16672 Jan 20 2001 /sbin/mkreiserfs
-rwxr-xr-x 1 root root 9060 Jan 25 2001 /sbin/mkswap
The command mkswap creates a swap filesystem on your swap partition in a given partition. If the swap partition is to be /dev/hda1 then the command
mkswap /dev/hda1
creates the swap file system on hda1. Operating systems use swap space for extra memory when RAM space is filled. The next step would be to turn on the swap using the command swapon /dev/hda1. You can ignore any warnings it gives you if you have already done this once. swapon no longer creates a problem under these conditions.
Laying down your file systems
Linux supports many file systems. Below is a list of the most common options and some of the programs needed to create the file system.
1. ext2 mke2fs
2. reiser mkreiserfs
3. vfat
4. ext3
A suggested command to create an ext2 file system might be:
mke2fs -b 1024 -c -i 1024
This code would create an ext2 file system with 1024 size blocks and 1024 bytes per inode. It also checks the physical drive for defects.
File System Layout
File Systems are organized on all Unix systems in roughly the same way. Almost all Unix systems, including Linux and GNU based systems, contain the following sub-directories, and familiarity with these sections of your system is important in your development as a GNU/Linux user.
ROOT / ==>Top level directory
TEMP /tmp ==>Special subdirectory for important temporary storage of information such as lock files, sockets, and other on-the-fly configuration settings
HOME /home ==> Area where users store their files
USER /usr ==>Area for user space programs and configurations
VAR /var ==>Area for logging messages, spooling mail and print services, faxes and more
ETC(pronounced ett-see) /etc ==>This subdirectory contains most of the configuration files and boot up files that are read as the computer comes on line. Included in this subdirectory are the files which configure mail, windows, passwords, groups, the file system setup and default user settings.
LIB /lib ==> This section holds binary libraries for the system, including C shared libraries
SBIN /sbin ==>This section holds core system programs needed to use and run your operating system. Included in here are the programs which lay down the file system, fdisk, and other core programs.
BIN /bin ==>This subdirectory stores key programs which allow users to use the system. Programs that list directories, move files, change your directory, change file permissions and other core user functions are stored in /bin
OPT /opt ==>This subdirectory contains large optional programs and sub-systems such as office suites and window environments
USER-X11 /usr/X11R6 ==>contains most of the X windows system
SOURCE /usr/src ==>This directory contains the Linux Kernel Source Code and other source code
System Startup Directory /etc/rc.d ==>Contains system startup scripts
Despite the efforts of many people over many years to standardize the exact layout of the Linux file system and, previously, other Unix clone systems, an exact standard has failed to emerge for a number of reasons. However, both the Free Software Foundation and Linux designers have hammered out the Linux Directory Initiative, which is attempting to create a tighter standard. Slowly most distributions are converging on this system, and you should hear more about it in the future.
Chapter 5
Kernel
Essentials For The Uninitiated
Understanding What Makes Your Computer Tick
Much has been said about the Linux Kernel and the GNU/Linux operating system. We've even learned that the Kernel is the piece of software which is loaded into the RAM of your computer when it boots, and then controls access and directly runs your hardware. However, we haven't yet looked closely at what a Kernel is and how it relates to your total system and to the applications which you run. We are now going to take a closer look at what the Kernel is and how it works, so that we can have a finer grain of control over our computers and can better understand how our systems react to stress and changes.
A kernel is the most basic part of the operating system, which speaks to the various parts of your hardware and is responsible for launching all other programs in your computing environment. The Linux kernel is the only part of the Linux operating system actually created by Linus Torvalds. The other components in a Linux distribution which you might think of as "Linux" are actually the work of other developers. Chief among these other sources are contributions from Richard Stallman's GNU project sponsored by the Free Software Foundation. But other projects also contribute to a complete Linux system and, together, Linux is largely a mix and match of various efforts.
The GNU project has contributed so much of the peripheral programming which leverages the Linux Kernel that Stallman makes the case that Linux should be called GNU/Linux. I leave this controversy to others, however we adopt this terminology in this text because we find Mr. Stallmans position with merit.
When installing GNU/Linux for the first time on a computer, it is most important to choose a boot kernel from your installation media which is proper for your hardware. In fact, you will repeatedly hear throughout this course that as a user of Linux, you need to know quite a bit of information about your hardware. While this might seem a daunting task at first, generally it is really very straightforward and you will learn about your hardware in short order.
What is a kernel and which Kernels to use?
One of the first things to know about your computer is if the machine is SCSI or IDE in relationship to the hard drives. Most Intel systems are IDE, but higher-end machines are most usually SCSI. Linux, pretty much by default, can handle an IDE system. SCSI systems, however, often need to load specific kernel extensions to read the hard drive.
In order to know which Kernel Modules to use for your system you must know your hardware.
Not long ago the Linux kernel was composed of a single binary file which was read at boot time and run in memory, interfacing with all the rest of the computer's hardware and providing services. Soon it became apparent that this construction of a single, statically running kernel, while allowing for quick initial development, was limiting the usability of the system and making hardware driver development and testing difficult. When creating a new hardware driver by the old method, you would construct your source code under the larger Linux sources code tree, and then you would recompile the entire kernel over again. Then you would need to reboot the system (assuming everything worked), debug the code, and try the whole process again.
Needless to say, this was very tedious and a new model emerged for driver development, one which uses dynamically loaded kernel modules which the kernel can load and unload upon request. The need to reboot for driver testing essentially ended. Today, huge numbers of drivers are automatically loaded and unloaded as needed. Often SCSI drivers are loaded dynamically along with other needed kernel modules when the system boots and when the boot manager initially hands control over to your Kernel. One of the reasons for this is because there are so many different possible cards which run your SCSI device that automated systems need to be invoked in order to probe for existing hardware and load all the necessary software components. Each card make and model needs a different driver.
In order to make a kernel which can probe for and work with many different cards, distributions need to construct kernels with modules, loading and unloading them as needed. Without loadable modules, the kernel would be slow and enormous, and conflicts could even arise which could cause problems in the functionality of the loaded kernel. In fact, in the case of a SCSI hardware computer, the kernel initially uses a RAM Disk with Kernel modules on it and loads the SCSI kernel module before the hard drives are properly mounted. In fact, the Kernel can't mount the drives without these essential modules. This RAM disk, similar to the one created during the installation to gain access to fdisk, is called initrd and is called by the boot manager along with the actual Kernel image.
Before installing, it is important to know which kernel drivers you need to load. Although the new distributions do a fairly good job of detecting a fair amount of hardware, it's still important to know exactly the hardware you're using so that you can anticipate and analyze problems if your going to have any chance at all at overcoming trouble when it happens.
Kernel source code is usually stored on you system and is located in the directory /usr/src/linux.
Kernel Modules can be located in different locations depending on the Linux kernel version.
Version 2.2 looks like this:
/lib/modules/2.2.18/
Version 2.4 places the modules in links to the kernel source code
/lib/modules/2.4.12/kernel
Because different versions of the kernel place modules in different locations, it is important to keep the kernel updates in line with the module tools. The programs modprobe, depmod, lsmod and rmmod all control module loading and unloading. In addition, the kernel can load modules automatically under the proper conditions. Upon booting, different distributions use different mechanisms to dynamically load modules. mkinitrd is the program which most normally constructs the needed module information in a ram-based file system. In SuSE this exists under the /boot directory. Slackware puts everything under the root directory. With SuSE, there might exist a module_info file.
When Kernels don't boot properly, the trouble is almost always with missing modules or the failure of the kernel to boot the proper modules for drive reading and writing. If you know your hardware, and with a little experience, this condition is often easy to fix.
Chapter 6
Software
Packages and System Upgrades
Adding Functionality to Your System
After you successfully partition your hard drive for the first time, determine your partitioning scheme, and create your file systems for your hard drive, the next stage of installation is the copying of software onto your freshly prepared hard drive. One of the keys to using Free Software is the availability of having source code along with your programs. Even beginners, non-programmers, and strict end users benefit from the possession of the source code. It's not hard to compile programs in GNU/Linux from the source. And often, the advantage of being able to grab the source code and compiling a program by hand is very useful. Source code from download sites is normally a newer release than available pre-compiled binary programs. In addition, when compiling software, the programers create automatic configuration of the could as part of the compile. Applications, as they are compiled, can make discoveries about your system which allow for a more efficient end product. The programs are then custom compiled for your environment. When one gets the source code they also receive useful information like the contact information for the development team and specific information about the product which can be helpful to your work and use. Finally, compiling the source code can allow you to set up the program by a means which is more tailored to your native environment.
However, as a practical matter, there is so much software, that for many parts of the code base it is nearly impossible to compile some programs on a fresh install, especially before programming tools are available. Everyone who uses a Free Software system is somewhat dependent on the available of generically precompiled binaries when installing the system for the first time, or when making necessary upgrades for security purposes. We are all dependent on the availability to binary distributions to a varying degree.
After setting everything up with your hard drive, your next goal is to choose the software that you want the installation program to install. For Slackware, you can usually just install all the software, because the distribution is small. For SuSE, things are very different. A SuSE distribution comes with 7 packed CD ROMs of programming and source code. Choosing everything can strain many larger systems and leave you with no room left on the drive. However, SuSE is excellent for learning about what Free Software has available and allows you to explore over a thousand programs.
Package Management
Packages are primarily binary files with programs and libraries which are installed on your system. Usually after installation, the package names are entered into a database to keep track of dependencies and installations. As systems become more advanced, dependency on packages provide a huge convince for end users and system administrators, by assuring an orderly installation of your programs, and allowing for easy upgrades from one version to the next.
When you install your system, you generally have to walk through a series (often a long series) of packages for installation. Linux has 3 kinds of basic
packaging.
tar balls - Compressed tar files with a .tgz extension. Used with Slackwares pkgtool, they can also be untared by hand and installed manually. This is the most basic kind of package and source code often is supplied in tarballs.
rpms - Probably the most common packaging system used today. RPM's haves extensive dependency information within them and rpm tools interact with an internal database. While source code can be built directly from RPM's more often it consists of binary files. SuSE and Red Hat are largely dependent on this packaging system.
.debs - Similar to rpms, but more designed for cross network downloads, this packaging system was invented by the Debian group. Many consider it the available packaging system.
In addition to using the pkgtool from Slackware to install Slackware compressed tar archives, once should also be capable of opening a tarball using the command line program, tar. The command for a standard package with a tgz or or a tar.gz extension is as follows:
tar -xvzf mytarball.tgz
This command untars the archive and puts it in the current directory. This command untars verbosely while uncompressing the file after the 'f' argument. Tar was originally designed for tape archiving of whole hard drives, and can still be used for this function.
RPMs have several graphic user interfaces for their installation, including the gnome based Ximian product, Red Carpet, available for some system including some SuSE systems.
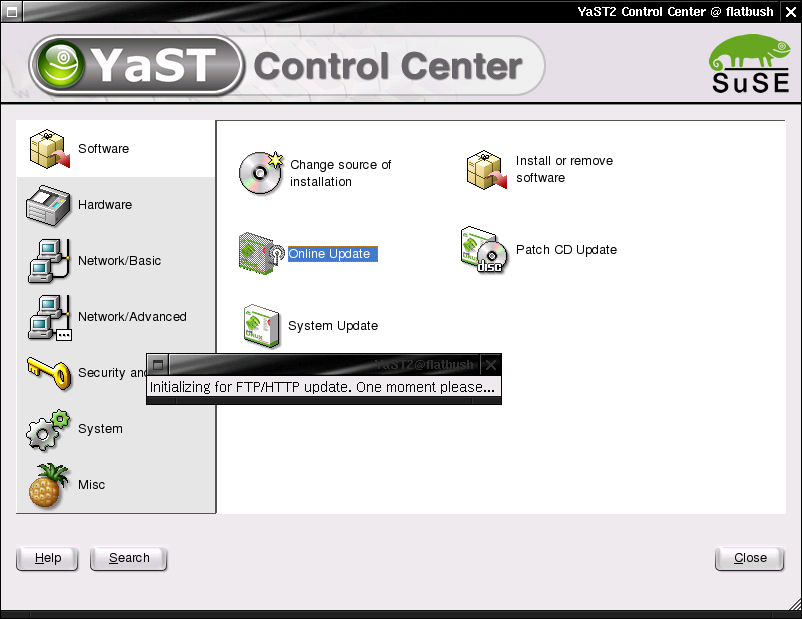
Illustration
6 SuSE YAST2 Online Grades
Fundamental Networking
The Internet functions primarily through 3 networking events which need to take place in order for two different host machines to talk to each other over the Internet. These three functions are:
Host Identification
Name Resolution
Packet routing
All three of these things must take place to get your computer on an Internet Protocol (IP) network. All three of these things need to be configured for proper installation of your host client on the net.
HOST identification: Each host on the interment which uses IP protocol 4 (IP4) needs to be assigned a unique 4 byte identifier. A byte is 8 bits. A bit is a single piece of digital information. If you view a light switch as a simple computer, the light switch stores information of a single bit, and the light can be either off or on. If you control a light bulb with 2 switches, you can have up to 4 levels of light, from completely off to completely on and 2 gradients in between. If you have 8 switches to control a single bulb, then you can have up to 256 gradients of illumunance from level zero to level 255. PC computer hardware sees many of it's hardware devices in 8 bit gradients. This 8 bit group is so common that it is called a byte. A byte can have a maximum decimal value of 255. A typical host IP address might look as follows:
206.254.3.203
This notation is called a dot quad and it represents 4 bytes. Mathematically this address can be represented like this:
11001110.11111110.00000011.11000101
As a binary notation (Binary means two – 0 or 1).
Each host on the Internet is assigned such a dot quad number. In addition, the host client generally exists within a subnet. A subnet for
this host might be:
206.254.3 (notice that this is only 3 bytes).
A subnet mask for this network might then be
255.255.255.0
This would define a network of 255 hosts ip addresses. This is defined by an agreed convention, so don't think to much into it. If a message is sent to be broadcasted to an entire network from a machine with an IP address of 206.254.3.10 and which has a subnet mask of 255.255.255.0, all the computers on the network from 206.254.3.1 – 206.254.3.255 are sent the message. A subnet mask is a similar concept as a graphics mask. When combined with an ip address it filters some addresses and allows others through as being identified as part of the network.
For the purposes of setting up your computer, you only need to know that you must have an IP Address and the appropriate netmask.
ifconfig is a program which sets your networking to a device and creates the ip address for the device, the mask and what is known as the broadcast address for the network. Usually you would not set it by hand as graphical administrative tools help set this, but it is useful to run to get a report on your current status.
root@www2:/home/ruben/www/nylinux/classes/notes/linux1 > ifconfig
eth0 Link encap:Ethernet HWaddr 00:01:02:CA:15:9E
inet addr:216.254.112.135 Bcast:216.254.112.255 Mask:255.255.255.0
inet6 addr: fe80::201:2ff:feca:159e/10 Scope:Link
UP BROADCAST RUNNING MULTICAST MTU:1500 Metric:1
RX packets:328708 errors:0 dropped:0 overruns:0 frame:0
TX packets:350902 errors:0 dropped:0 overruns:0 carrier:0
collisions:22340 txqueuelen:100
Interrupt:10 Base address:0xe400
Here it tells me that device Ethernet card 0 has an IP address of 216.254.112.135, a broadcast address of 216.254.112.255 and a netmask of 216.254.112.0. There is a mathematical relationship between the netmask, IP address, and the broadcast which I leave for the student to look up since this topic is beyond the scope of this course. (Hint – It has to do with something called a bitwise operation). Together, the host machine is now defined and it's local network is also defined.
GateWays
When connecting to the Internet, some form of a physical wire connects two or more hosts. When more than two hosts are connected together on the wire, a device is needed such as a hub, router or a switch. These devices are used to perform connections on a local network.
With a hub, a communication is transmitted over a wire from a computer. Once it reaches the hub, all the rest of the computers on the hub receive the message. However, since the messages is advertising itself as being for a specific host, all the other hosts on the hub generally ignore the messages being broadcast over the hub. In order to get outside of this simple network one machine needs to recognize that the message is not for the local network, and that same device must be connected to the larger Internet. This device is called a gateway. When your computer receives a message for a computer not on the local network, it must know to send that message to the gateway computer. The gateway computer sees the messages address is not on the defined local network, and it send the message out of the local network upstream to it's gateway on the Internet. The process is repeated until some computer on the Internet recognizes the message is for it's own local network. That remote machine now receives the message and sends it to the proper remote computer in it's foreign remote local network. Computers that perform this kind of routing and networking are called Gateways. They are also often refered to as routers.
Domain name Services
When using a name like http://www.nylxs.com, it is essential that you can resolve that name to a dotted quad net address. The computer with does this service for you is called a Domain Name Server. Your local domain name server is specified in the /etc/resolv.conf file. Mine looks like this:
domain mrbrklyn.com
namesever 216.254.112.135, 216.254.112.136, 216.254.0.9
namesever 216.254.0.9
namesever 216.254.112.136
Fundamental User Administration
A user is an account on your machine which has a user id number, and a group id number. Not all users are real. Some represent dameon processes, programs which are on all the time, run in the background, and answer requests. Human users get home directories and login shells. Remember that Unix is designed to be a multiuser environment. This is one of the main reasons why Unix viruses are almost unheard of. Each user has a /home/user directory where user is the name of your user account. When a user logs in, they usually don't see the whole file system, but only from /home/user which looks like the root. For example, I can start a program on the command line like this:
ruben@www2:~ > ls|less
ruben@www2:~ >
The ~ is a hint that your really in your home directory, and you can refer to home as ~/
To see what directory your actually in run pwd on the command line.
ruben@www2:~ > pwd
/home/ruben
ruben@www2:~ >
File permissions
All files have ownership and permissions in Unix and Linux
run the program ls -al on your command line.
ruben@www2:~ >ls -al
-rw-r--r-- 1 ruben staff 43106 Aug 28 2001 tokenboths.html
-rw------- 1 ruben staff 199168 Feb 22 01:58 toshiba.xls
-rw-r--r-- 1 ruben staff 10178 Dec 18 13:01 universal-dmca.html
-rwxr-x--- 1 ruben staff 7391 Feb 15 2001 updategrades2.pl
-rw-r--r-- 1 ruben staff 28431 Aug 17 2001 upfront.html
drwxr-xr-x 5 ruben staff 4096 Dec 11 2000 vim-5.7
This first column describes the permissions. The third columns describes the user which owns the file, and the forth column the group which owns the files.
The first file listed here is owned by ruben and group staff. Ruben can read and write to the file. Anyone in group staff can read it, and anyone in the world can read it.
The file updategrades2.pl is set executable. For the user ruben, the file permissions on the file updategrades2.pl is read, write and executable. For the group staff, members can read it and execute it, and everyone else can only execute the file. File name extensions in GNU/Linux are meaningless to the Kernel and the Operating System. Some programs might utilize the file extenssion (the part of the file name after the dot) to help identify a file according to some accepted convention (such as an HTML file), but nothing is set in stone. A program is only executable when the permissions for the file are set to be executable.
When programs run, they run as a representative of a user and group. The running program can only do what its user identification is allow to do. All files and running programs have a user and group identification. Some programs are SUID which stands for “set user id”. They start as one user, and morph to another as needed (usually to root). SUID programs and files are a security risk which must be managed.
Users are defined in the password file:
/etc/passwd
This file maintains the basic user information within it. It must be world readable since everyone who logs into the system, and all programs which run need to know what user they are. It looks like this:
root:x:0:0:root:/root:/bin/bash
bin:x:1:1:bin:/bin:/bin/bash
daemon:x:2:2:daemon:/sbin:/bin/bash
lp:x:4:7:lp daemon:/var/spool/lpd:/bin/bash
games:x:12:100::/var/games:/bin/bash
man:x:13:2::/var/cache/man:/bin/bash
at:x:25:25::/var/spool/atjobs:/bin/bash
ruben:x:500:101:Ruben I Safir:/home/ruben:/bin/bash
adam:x:501:100::/home/adam:/bin/bash
brian:x:503:101:Brian Sietz:/home/brian:/bin/bash
joe:x:505:101::/home/joe:/bin/bash
The first column is the user name. The second column is where the password USED to be. 3rd Column is the user id number. Forth column is the default group id number for the user. The fifth column is personal data which might be included in your mail. The sixth column is your home directory, and the seventh column is your shell (the program which you type into when you are on the command line)
Groups are defined in the group file.
/etc/groups
One looks like this:
staff:x:101:ruben,brian,jon,mike,leonid,liz,joeg,paulr
mysql:x:102:
gdm:x:87:
maildrop:x:59:
perforce:x:60:perforce
student::103:liz,user01
btech::104:ruben
deluge::105:
sybase:x:106:
The group file defines a group and can add users to the group as needed. The group “staff” in this file is group 101 and has the users ruben, brian, jon, mike, leonid, liz, joeg, and paulr added to the group. In addition, users can be assigned to groups to in the /etc/passwd file individually.
Adding A User
Adding a user is different from distribution to distribution, but it essential means setting an entry in the /etc/passwd file, creating an entry the shadow password file with an encrypted password, creating a home directory, setting a default shell for the user, and transferring core user files into the home directory. These core files include .profile .bashrc and others which control the environment of the shell.
root user
The root user can do anything on the system. They are user 0 in the password file. Do not do regular tasks as root. You will live to regret it.
Basic Mail
Free Software Unix Clones have an inherent capability to receive mail. If you have an account on you host, you can send mail to your account using SMTP protocols. Your computer has a mail dameon which listens for mail delivery on the Internet for you. To read your mail, you can use any of the dozens of mail clients available. Some command line mail clients include:
elm - Simple Mail client
mutt – Similar to elm but newer
pine - more complex mail client
Graphic mail clients include:
Evolution, Balsa, Mozilla, kmail.
Mail is generally delivered to the following file on your computer:
/var/spool/mail - directory where mail is put for each users.
each user gets ONE file in this directory. It would look like this:
/var/spool/mail/ruben
ruben@www2:~ > ls -al /var/spool/mail
total 11888
drwxrwxrwt 2 root root 4096 Feb 25 16:05 .
drwxr-xr-x 19 root root 4096 Oct 31 22:14 ..
-rw------- 1 adam users 0 Apr 9 2001 adam
-rw-rw---- 1 akosmin root 439476 Feb 25 15:33 akosmin
-rw-rw---- 1 brendan root 45837 Nov 29 22:48 brendan
-rw------- 1 brian staff 0 Apr 4 2001 brian
-rw------- 1 dovid users 2094 Aug 31 16:30 dovid
-rw------- 1 ellen users 1527 Dec 18 22:14 ellen
-rw-rw---- 1 jays root 125955 Feb 25 15:05 jays
-rw-rw---- 1 jfrey root 38078 Feb 25 00:04 jfrey
-rw-rw---- 1 jobs root 27425 Jan 26 15:08 jobs
-rw------- 1 joe staff 1561 Jan 5 18:22 joe
-rw-rw---- 1 joeg root 3204852 Feb 25 15:33 joeg
-rw------- 1 liz staff 1350955 Feb 25 15:33 liz
-rw-rw---- 1 marco root 4826 Feb 3 23:30 marco
-rw-rw---- 1 mconti root 282888 Feb 25 15:33 mconti
-rw------- 1 mike staff 547 Apr 3 2001 mike
-rw-rw---- 1 miker root 99897 Feb 23 18:17 miker
-rw-rw---- 1 oag root 803 Oct 7 23:24 oag
-rw-rw---- 1 paulr root 0 Feb 3 18:55 paulr
-rw-rw---- 1 phantom2 root 4027 Jan 27 23:32 phantom21
-rw------- 1 root root 2141115 Feb 25 15:47 root
-rw-rw---- 1 ruben root 915168 Feb 25 16:03 ruben
-rw------- 1 spam-kil users 670655 Feb 22 12:27 spam-killer
-rw-rw---- 1 taly root 1020 Dec 24 22:42 taly
-rw-rw---- 1 rupesh root 2710832 Feb 10 08:13 user01
-rw-rw---- 1 fmorris root 706 Jul 9 2001 user02
-rw-rw---- 1 wynkoop root 932 Oct 6 21:15 wynkoop
What are the permissions of these files and why?
mail addressing
Your mailing address is usually
user@host.doman
My main workstation is called www2.mrbrklyn.com, and I have mail on it
at ruben@www2.mrbrklyn.com.
Through manipulation of DNS and Sendmail, it so happens that ruben@mrbrklyn.com
ALSO works
Try this
dig mx mrbrklyn.com
ruben@www2:~ > dig mx mrbrklyn.com
; <<>>> DiG 9.0.1 <<>>> mx mrbrklyn.com
;; global options: printcmd
;; Got answer:
;; ->>HEADER<<- opcode: QUERY, status: NOERROR, id: 54747
;; flags: qr aa rd ra ad; QUERY: 1, ANSWER: 1, AUTHORITY: 2, ADDITIONAL: 1
;; QUESTION SECTION:
;mrbrklyn.com. IN MX
;; ANSWER SECTION:
mrbrklyn.com. 86400 IN MX 10 www2.mrbrklyn.com.
;; AUTHORITY SECTION:
mrbrklyn.com. 86400 IN NS www2.mrbrklyn.com.
mrbrklyn.com. 86400 IN NS ns1.speakeasy.com.
;; ADDITIONAL SECTION:
www2.mrbrklyn.com. 86400 IN A 216.254.112.136
;; Query time: 26 msec
;; SERVER: 127.0.0.1#53(127.0.0.1)
;; WHEN: Mon Feb 25 16:09:37 2002
;; MSG SIZE rcvd: 109
This says that my address mrbrklyn.com is sent to www2.mrbrklyn.com
X Configuration
What is X
X is a network ready application server is a standard windowing system
attached to it. It has the appility to run a program and display it anywhere on the internet. An X server runs locally and talks to client programs, like an editor in which might be in Chicargo, and run it somewhere, which might be remotely in New York.
Vsync, Hsync
Know your hardware. X must know the VSYNC and HSync rate of your monitor
to do presentation correctly. This is the speed which a monitor paints horizantal and vertical lines on a screen.
Video Cards
X must know the chipset which runs your video card since the X server talks directly to the video card. Each video card model has a different computer chip which runs it. Currently there are two versions of X, version 3 and the newer version 4.
XF86Setup is program to setup X11R6 3
xf86cfg is for X11R6v4
SuSE Linux comes with another helper program called SaX. There programs create an X configuration file. The file helps X control the mouse, screen resolution, and remote networking application services.
Use of X:
Since X uses a client server model, it just doesn't care what window manager you run on it. Free Operating systems come with dozens of interfaces which can look like Microsoft Products, Apply Protucts, or which are unique. You can choose any window manager you want. Some examples of a Window manager is:
wmaker
fvm95
Client/Server processes
You can run X with just an xterm as a client like this:
$ xinit /usr/X11R6/bin/xterm
Note a window manager exists under this circumstance and your xterminal has no resizing or titlebar buttons. You also have large meta environments for X users:
Gnome
KDE
These sit above a window managers to give other services like drag and drop capability.
xterm
Virtual terminal is X with X cut and paste. It acts like a cumputer terminal in a box on your desktop.
file managers – Different X environments have different file mangers at their disposal. In Gnome, you have Nautilus, KDE kwindow. There are also others like tkdesk, xfm and others.
virtual desktop - X allows for many desktops to run at the same time and you can flip from desktop to desktop. This is an extraodinary useful feature of X for productivity and work.
Networked displays - run there, display here. Any application in X can run anywhere in the world, remotely. This is why X is called an application server.